The 3D Print Waste Mountain: Can You Really Recycle It at Home?
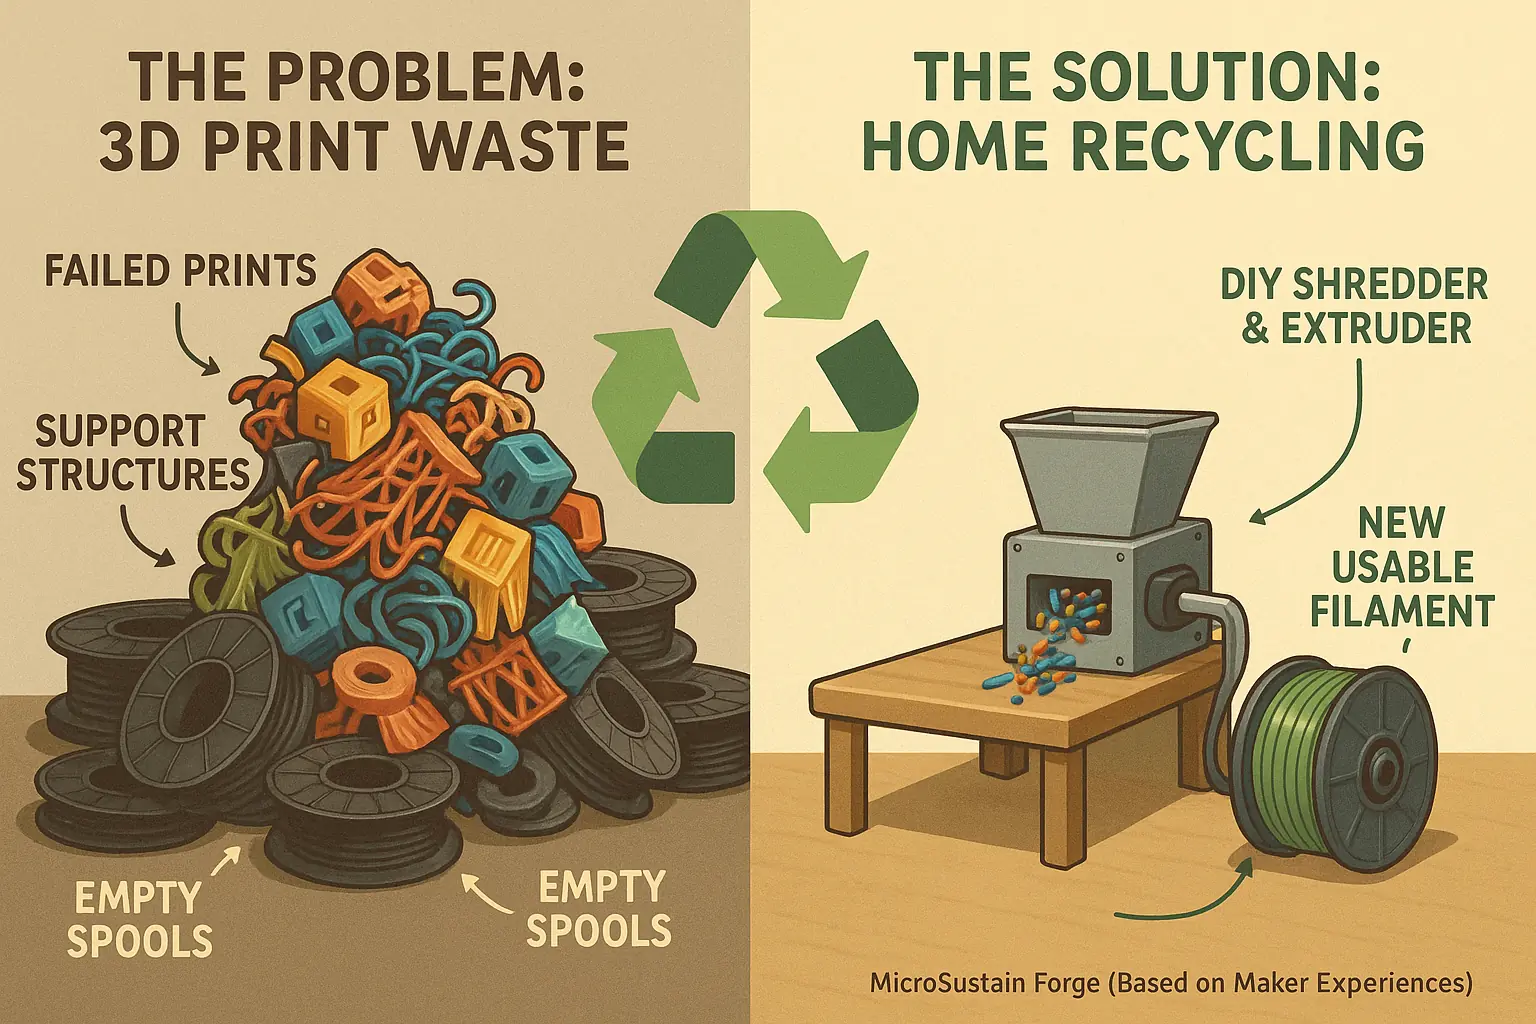
Ever stare at that growing pile? Failed prints, support structures, empty spools. This plastic mountain is a shared maker frustration. Our community data mining confirms this widespread challenge. So, can you genuinely recycle this 3D print waste in your own workshop? We investigate.
Let's be brutally honest. DIY 3D print recycling demands real effort. It gets messy. Patience becomes your best tool. Realistic expectations are absolutely key for any success. This guide cuts through the usual hype. We focus on what makers actually achieve, drawing from thousands of workshop experiences.
This section covers common waste types like PLA and PETG. We will detail practical recycling setups for small workshops. Safety considerations are critical in these processes. You will understand the true quality achievable with DIY recycled filament. MicroSustain Forge helps you learn from collective maker wisdom. Ready to turn that scrap plastic into a real asset?
What 3D Print Waste Can You Actually Recycle? (And What to Skip)
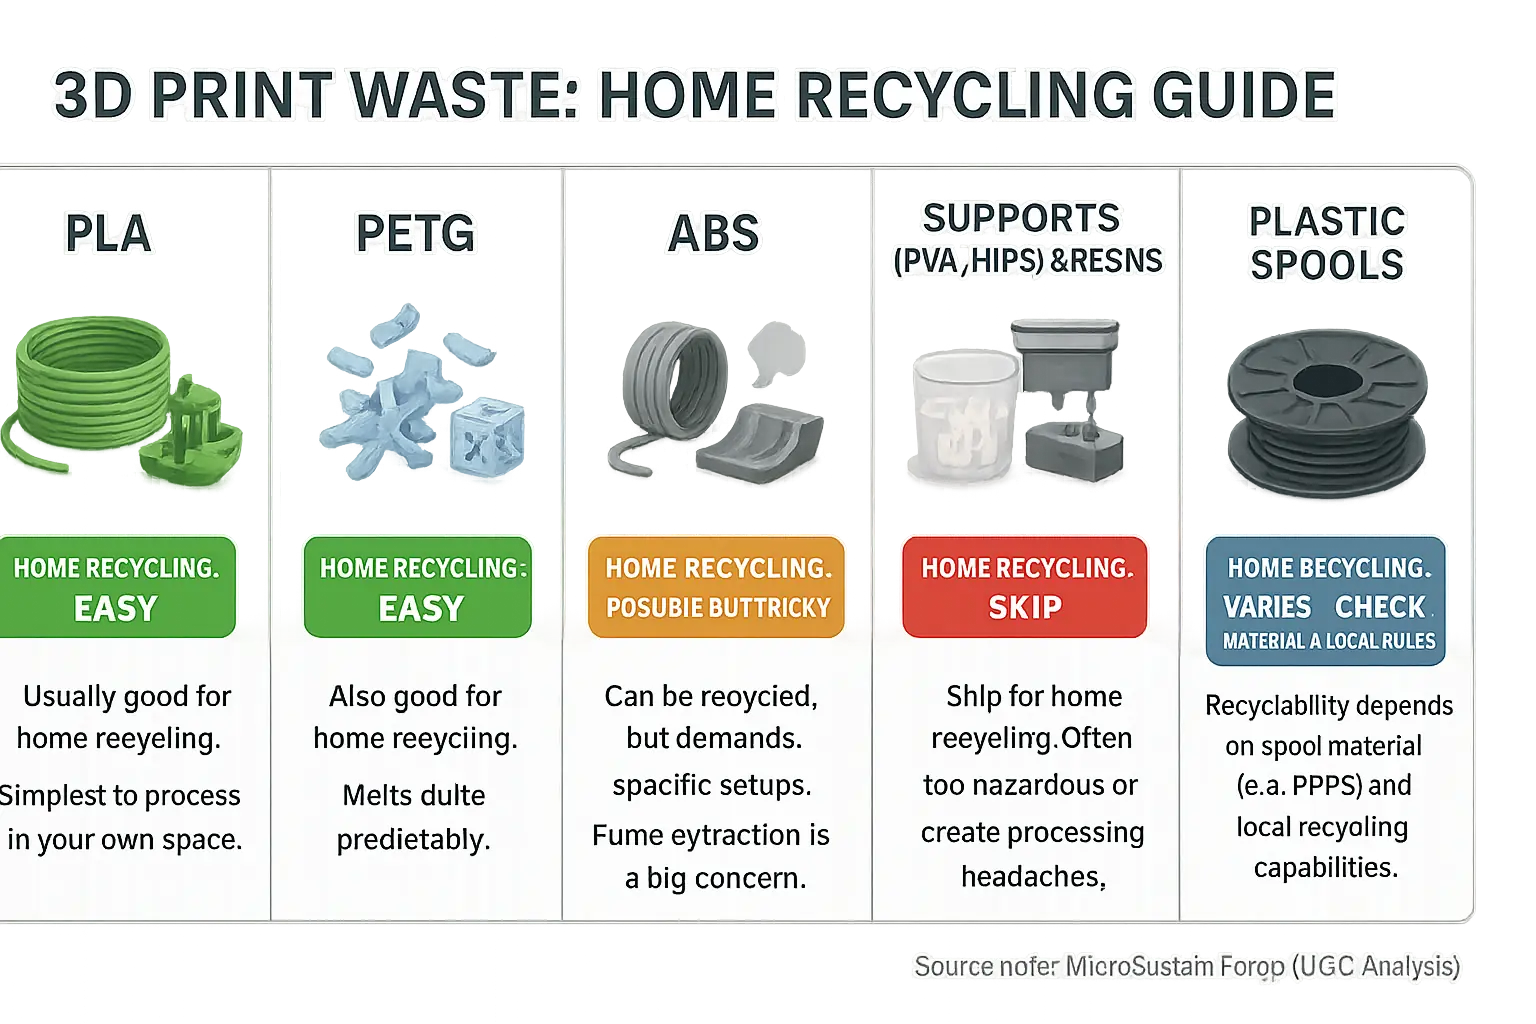
Not all 3D print waste is equal. Far from it. Your PLA filament scraps? These are usually good for home recycling. PETG remnants also join this category for many makers. Other materials present more complex challenges. Understanding these differences is absolutely key for successful workshop recycling.
Most makers find PLA the simplest to process right in their own space. PETG follows closely behind as a favorite. Both these materials melt quite predictably. The online maker community has developed solid, shared methods for handling them. These are your best starting points for DIY filament recycling. Success stories abound with these two.
Then there's ABS. It can be recycled. True. But it demands more specific setups than PLA or PETG. Fume extraction is a big concern users consistently highlight with ABS. What about resins, or support materials like PVA and HIPS? Community consensus strongly suggests skipping these for any home recycling attempts. They are frequently too hazardous or create too many processing headaches for typical workshop environments.
Knowing your specific plastic type is half the battle. Seriously. Get this identification right from the very start. Your entire recycling journey then begins on much more solid ground. This proper sorting prevents contamination. It saves significant headaches later on in the process.
DIY Plastic Shredders: The Reality of Building Your Own (Maker Insights)
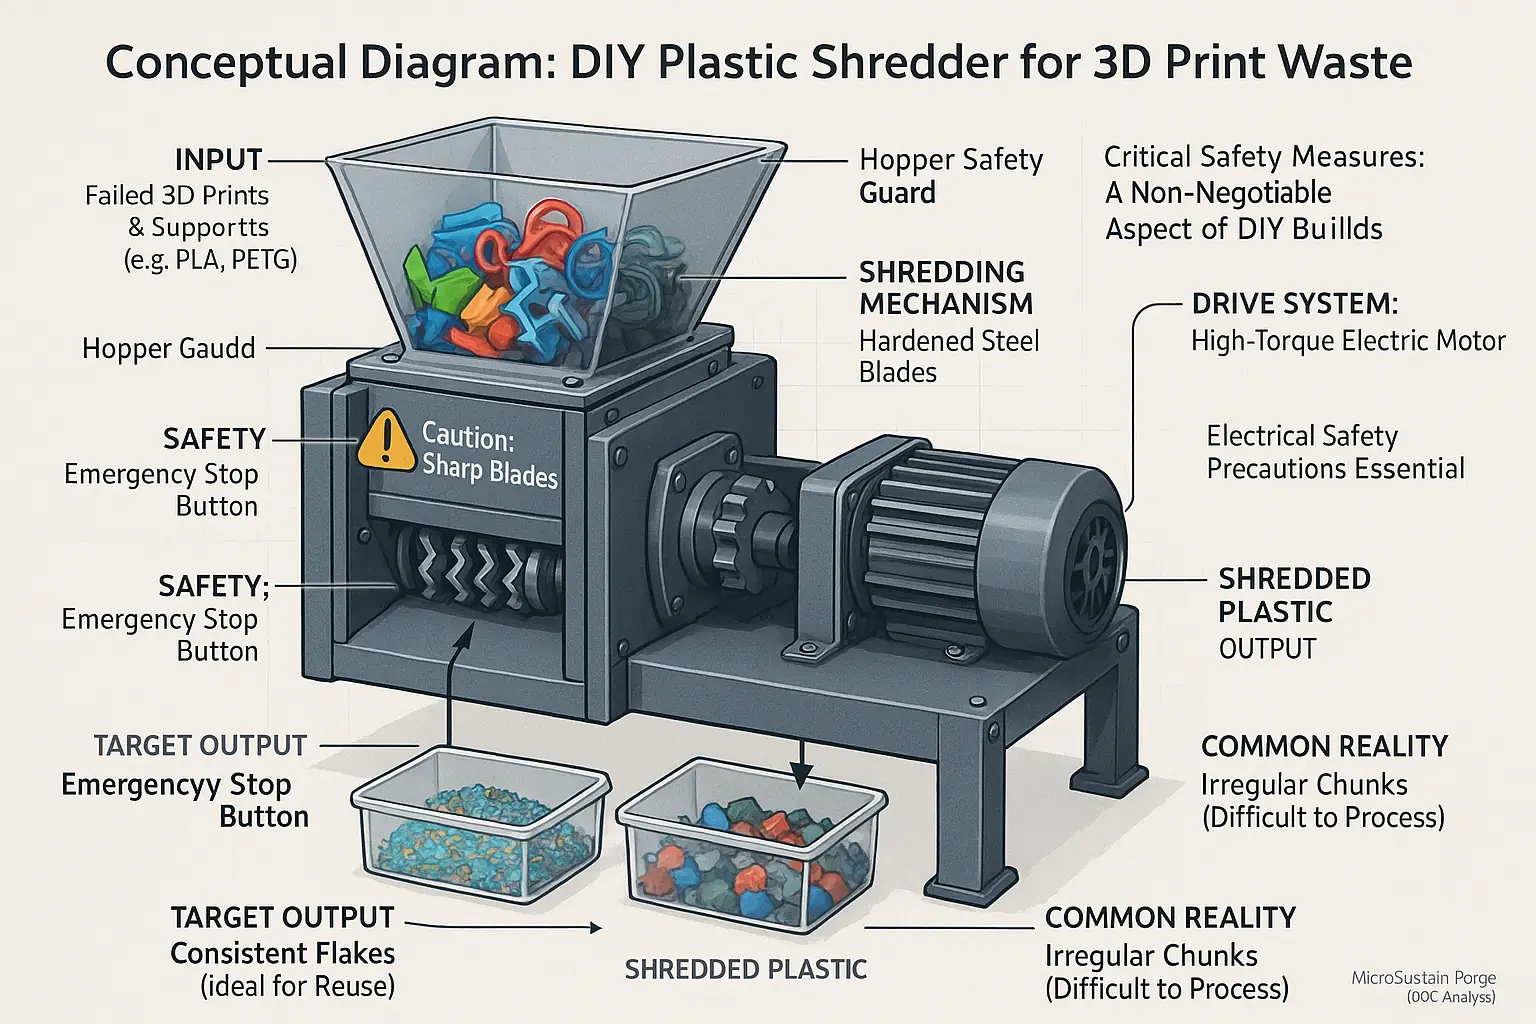
The idea? Hugely appealing. Turning failed 3D prints into reusable flakes with a homemade shredder attracts makers. Many makers dream of this closed loop for their plastic waste. DIY plastic shredders represent a popular first step in home recycling efforts for 3D print materials.
The reality? It's tough. Building an effective, safe plastic shredder demands serious effort from the builder. This is not a casual weekend project for most individuals. Many users report mixed results from attempts to modify common paper shredders. Dedicated designs require significant time, specific DIY tools, and often, a surprising budget. The community consensus points to a real gap between slick online showcases and actual workshop struggles.
Maker communities showcase diverse shredder designs and their varying complexities. You will find simple, hand-cranked models built by some. Others construct more complex motorized units. The output quality of shredded plastic? It varies wildly. Some makers successfully produce consistent flakes, ideal for direct reuse in filament extruders. Many others, however, report ongoing struggles, ending up with irregular chunks difficult for further plastic processing.
Understand the full commitment. This is crucial before you start any build. The community's collective experiences offer invaluable lessons for prospective builders. These shared stories show what works. They reveal common pitfalls too. Critical safety measures are absolutely non-negotiable; makers consistently emphasize this vital point.
Homemade Filament Extruders: Forging Your Own 3D Printing Material
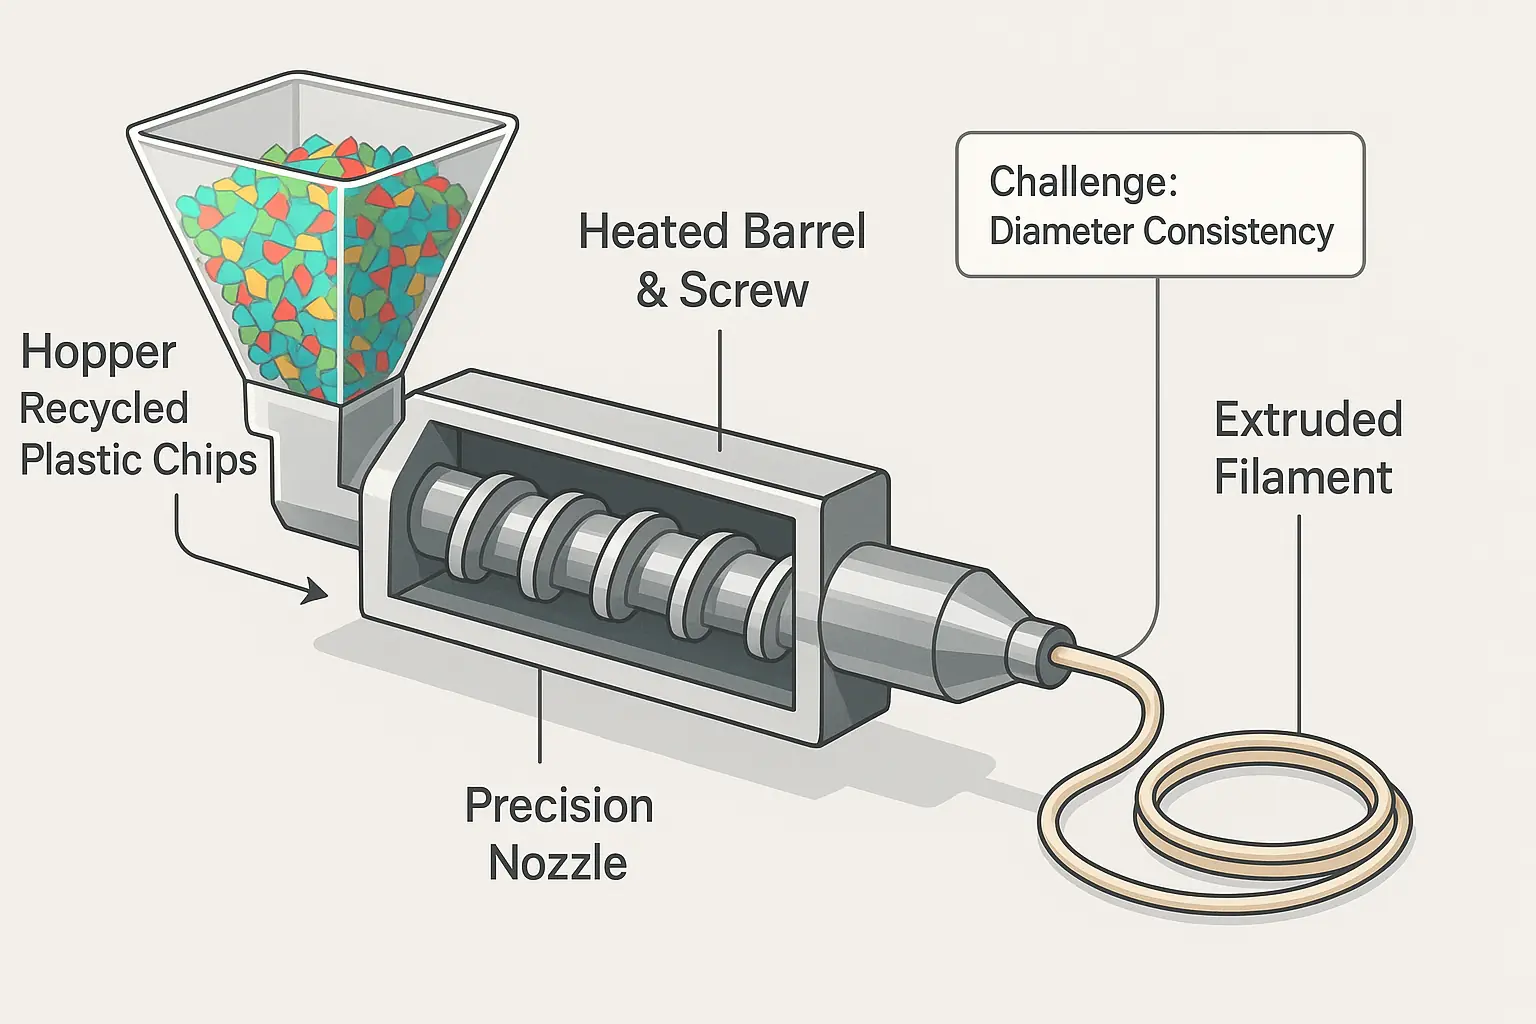
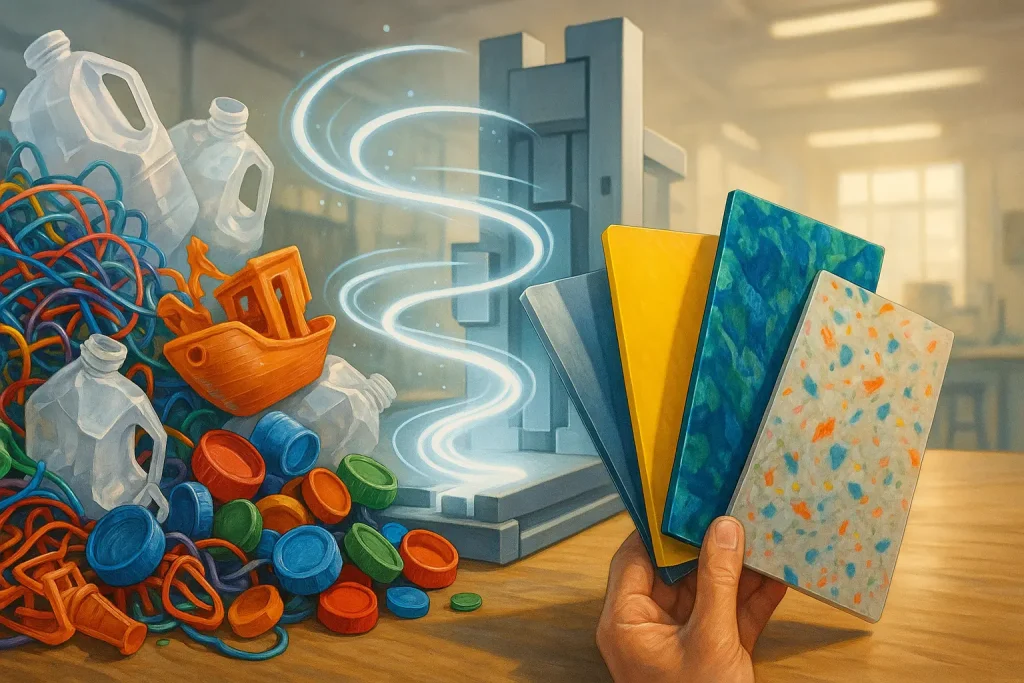
You have shredded plastic. What next? Many makers pursue filament extrusion. They create new 3D printer material. Imagine printing with plastic you recycled. A filament extruder melts plastic chips. It then pushes molten plastic through a precise nozzle. This process forms the filament strand.
Here the true work starts. Makers often report a major hurdle. Achieving consistent filament diameter is critical. Air bubbles plague homemade filament. Impurities also cause print failures. Even tiny variations can wreck complex 3D prints. The community dedicates immense effort to mastering this particular challenge.
Makers experiment with countless extruder designs. Some are simple hand-cranked devices. Others are more automated, complex builds. Our UGC analysis shows successful builds often produce usable filament. This homemade filament rarely matches commercial quality, however. Users learn to adjust 3D printer settings. These adjustments compensate for diameter inconsistencies and material quirks.
DIY extrusion is a journey. Expect trial and error. Lots of it. But the satisfaction? Immense. Printing with your own recycled filament truly closes the loop. This process transforms waste directly into new creations. It's a powerful achievement for any maker.
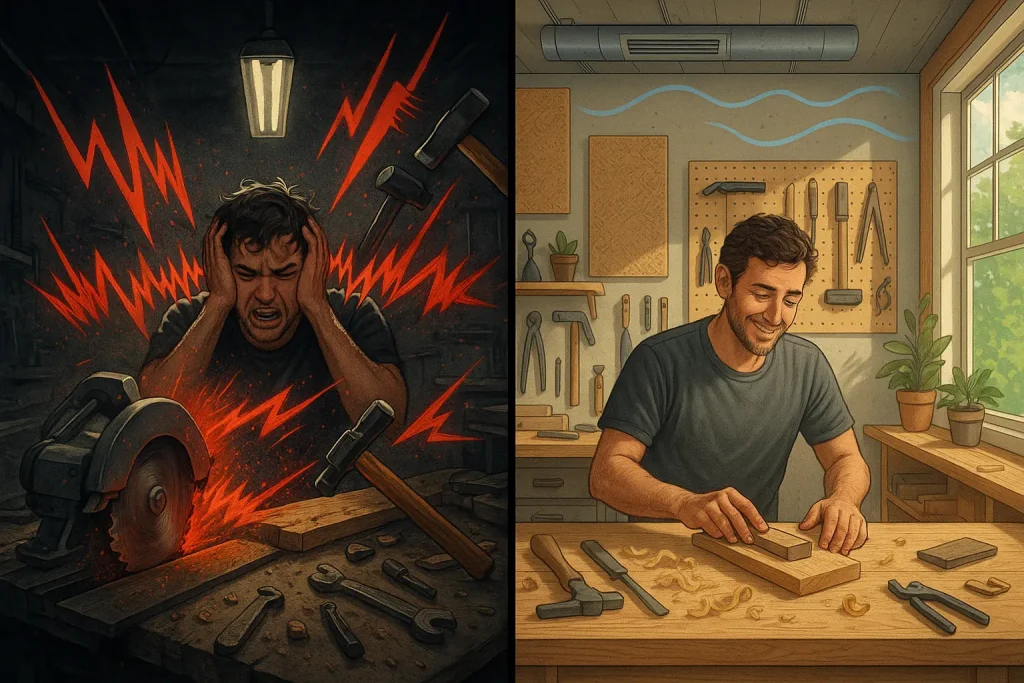
Safety First: Non-Negotiable Protocols for Home Plastic Recycling (Community Warnings)

Let's be absolutely clear: DIY plastic recycling involves serious risks. We're talking about hot plastic, sharp blades, and potentially toxic fumes. Safety is not optional here; it is non-negotiable.
Makers often report concerns about inhaling plastic fumes. This happens with materials like ABS or from accidental plastic burning. Microplastic dust from shredding is another silent threat. Physical dangers present another risk. These come from moving machinery parts and extremely hot extruder surfaces.
Proper ventilation is crucial. You need direct exhaust for fumes, not just an open window. Personal Protective Equipment (PPE) is your first defense line. Think respirators, safety goggles, and sturdy gloves. Never skip PPE.
The maker community has learned these lessons the hard way. Heed their warnings. Prioritize your health and safety above all else. This focus is critical when diving into home plastic recycling.
The Realities of DIY Recycled Filament Quality: What to Expect

You have built your shredder. Perhaps an extruder followed. The big question looms: how good is your homemade filament? Let's be direct. Do not expect commercial-grade perfection immediately. That is a common early misconception.
Makers frequently report filament consistency issues. Inconsistent diameter causes extrusion problems. You might observe color variations. Air bubbles can appear. Tiny impurities from the recycling stream also emerge. These imperfections can lead to frustrating print failures or weak final parts. Plain truth.
The community has found ways to manage these realities. Many makers adjust their slicer settings carefully. Printing slower often improves results with less-than-perfect material. Some design parts specifically forgiving of minor dimensional inaccuracies. Others embrace the unique aesthetic, turning color swirls or slight texture into a design feature. This adaptability is key.
Achieving flawless DIY recycled filament is a significant challenge. The value, however, extends beyond mere print quality. Learning the process deeply offers rewards. The sustainability impact feels tangible. Closing your own material loop provides immense satisfaction. It is a journey. Continuous improvement defines success here, not instant, perfect output.
Beyond Recycling: Creative Upcycling & Reuse Ideas for Failed 3D Prints
Shredding prints is not your only path. Extruding also demands effort. Many makers find incredible joy giving 'flops' a new purpose. They embrace creative upcycling, finding genuine utility. This highlights direct reuse perfectly.
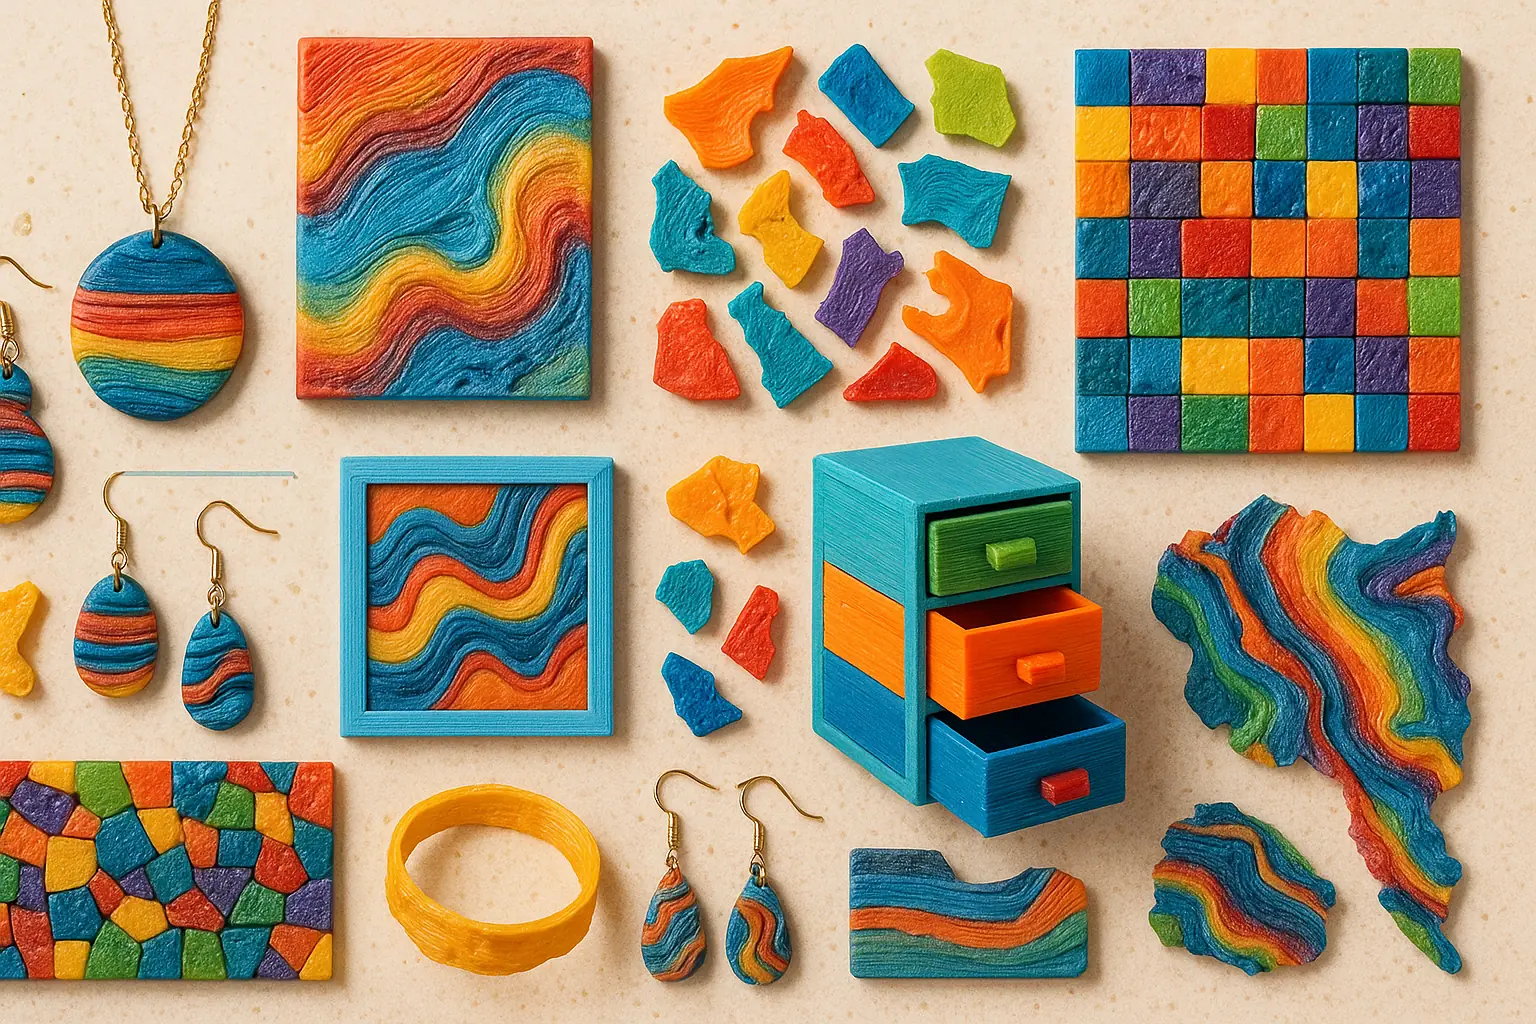
Think beyond the functional. Users transform misprints into stunning mosaic tiles. Some create unique jewelry from these plastic scraps. Others fashion abstract art pieces. The imperfections often add distinct character. A 'mistake' becomes a prized feature. The community celebrates such vision.
Functional upcycling is equally popular. Failed prints become sturdy drawer organizers. Makers build custom tool holders using them. Some use pieces as molds for other crafting projects. Support structures, often overlooked, can be melted. Users then shape them into small decorative elements. So practical. Pure genius.
This approach celebrates resourcefulness. It also champions maker creativity. You reduce waste without complex machinery. This proves 'failed' does not mean 'useless'. What will you create next?
Is DIY 3D Print Recycling Right for You? (Feasibility Calculator)
Assess Your DIY Recycling Potential
So, what did the calculator reveal? Your results paint a clear picture. This tool offers a personalized snapshot. It shows what DIY 3D print recycling truly means for your specific situation. A high score indicates strong potential; you might be well-equipped for comprehensive home recycling. Moderate scores suggest a balanced approach, perhaps focusing on specific waste streams first. Lower scores? They highlight practical hurdles, guiding you toward other impactful waste reduction strategies.
Your score is high? Excellent. You appear ready to tackle full home recycling. Makers with similar profiles often build impressive, efficient systems. Moderate scores? Consider starting smaller. Many successfully begin with just shredding filament for reuse or exploring creative projects with failed prints. This approach offers a manageable entry. If the calculator indicated significant commitment, do not despair. Focus on minimizing print waste upfront. Or seek local community initiatives; some maker spaces offer shared recycling resources.
Remember, this journey values progress. Perfection is not the immediate goal. Every step towards reducing your workshop's waste footprint constitutes a win. This tool provides insights from countless maker experiences. Use these findings. Forge your own sustainable making path, one thoughtfully managed print at a time.
The Unsung Heroes: Why Sorting & Cleaning Your Plastic Waste is Critical
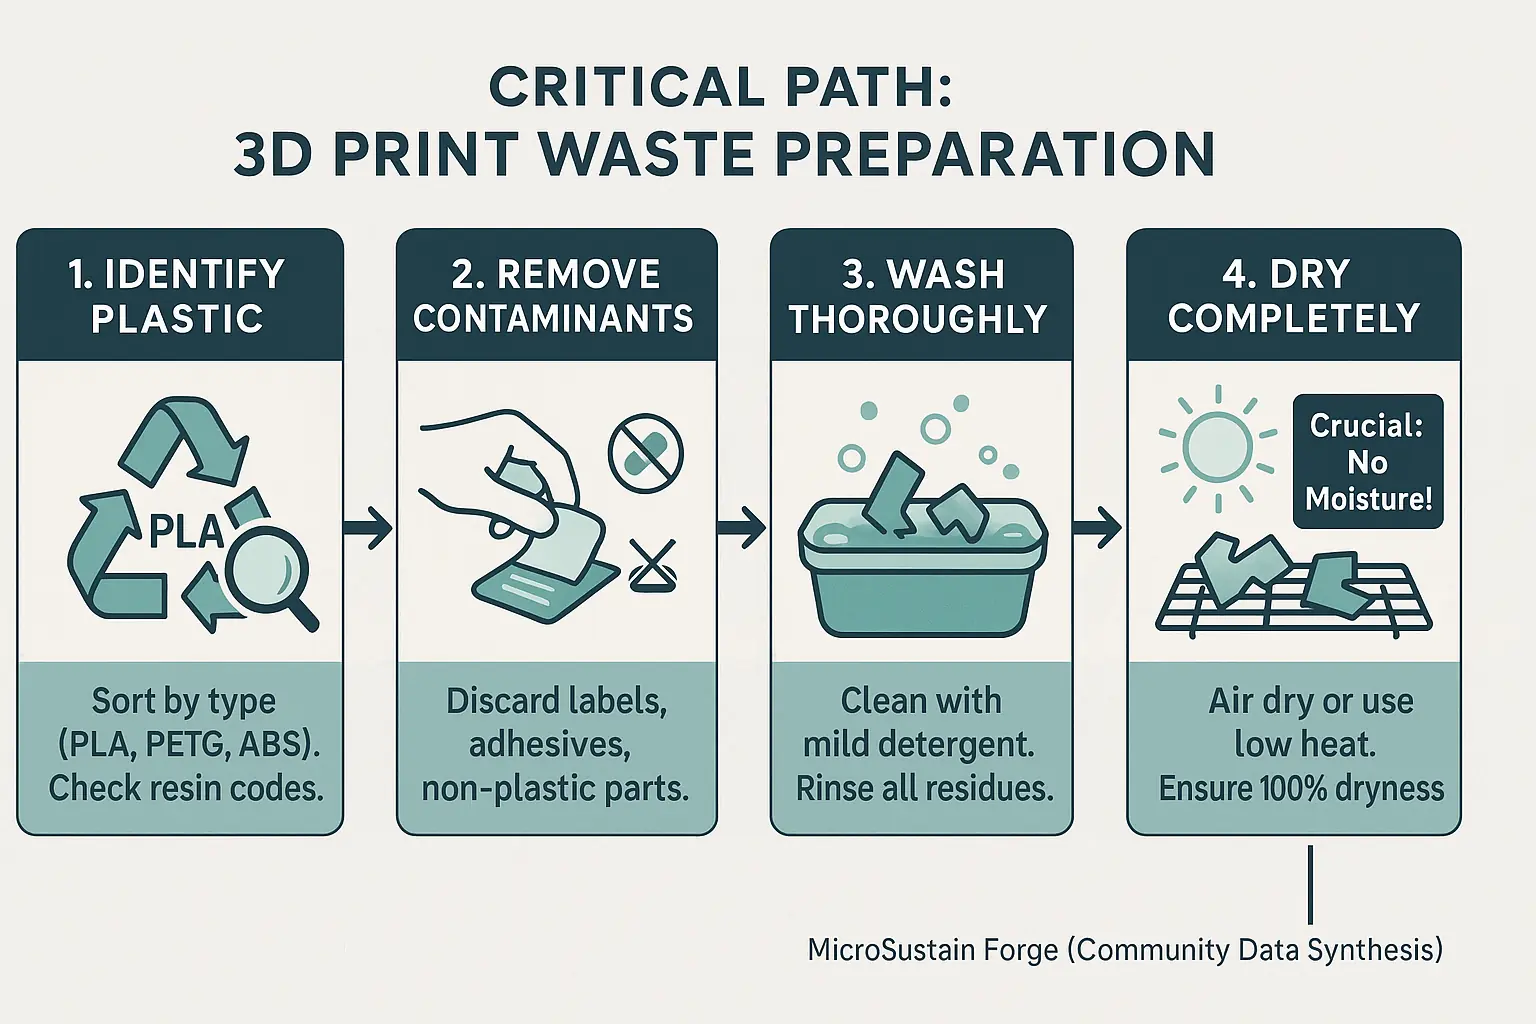
Before any shredding or extruding happens, you face the unsung heroes of DIY recycling: sorting and cleaning. Many makers underestimate this crucial preparation. Their oversight often leads to project failure. Meticulous preparation, however, is the absolute bedrock of successful plastic reclamation at home.
Think of the consequences. A tiny paper scrap or some lingering adhesive can jam your extruder. It might ruin an entire filament batch. Mixed plastic types? They simply will not melt or bond consistently together. The unspoken truth echoed in countless maker discussions: shortcuts here guarantee significant future frustrations and wasted material.
The community strongly recommends meticulous sorting by plastic type. Look for those small recycling symbols; they are your primary guide. Removing all labels, sticky residues, and any non-plastic elements is non-negotiable. A comprehensive wash followed by complete drying forms the next vital stage. Moisture is the persistent enemy of quality recycled filament, a fact users learn the hard way.
This foundational effort truly delivers results. Clean, correctly sorted plastic ensures smoother machine operation. It yields higher quality filament. Ultimately, it creates a far more rewarding recycling journey for you. Consider this the 'first commandment' of effective DIY plastic recycling, a principle proven by collective experience.
Beyond Flakes: Pelletizing Failed 3D Prints for Better Extrusion
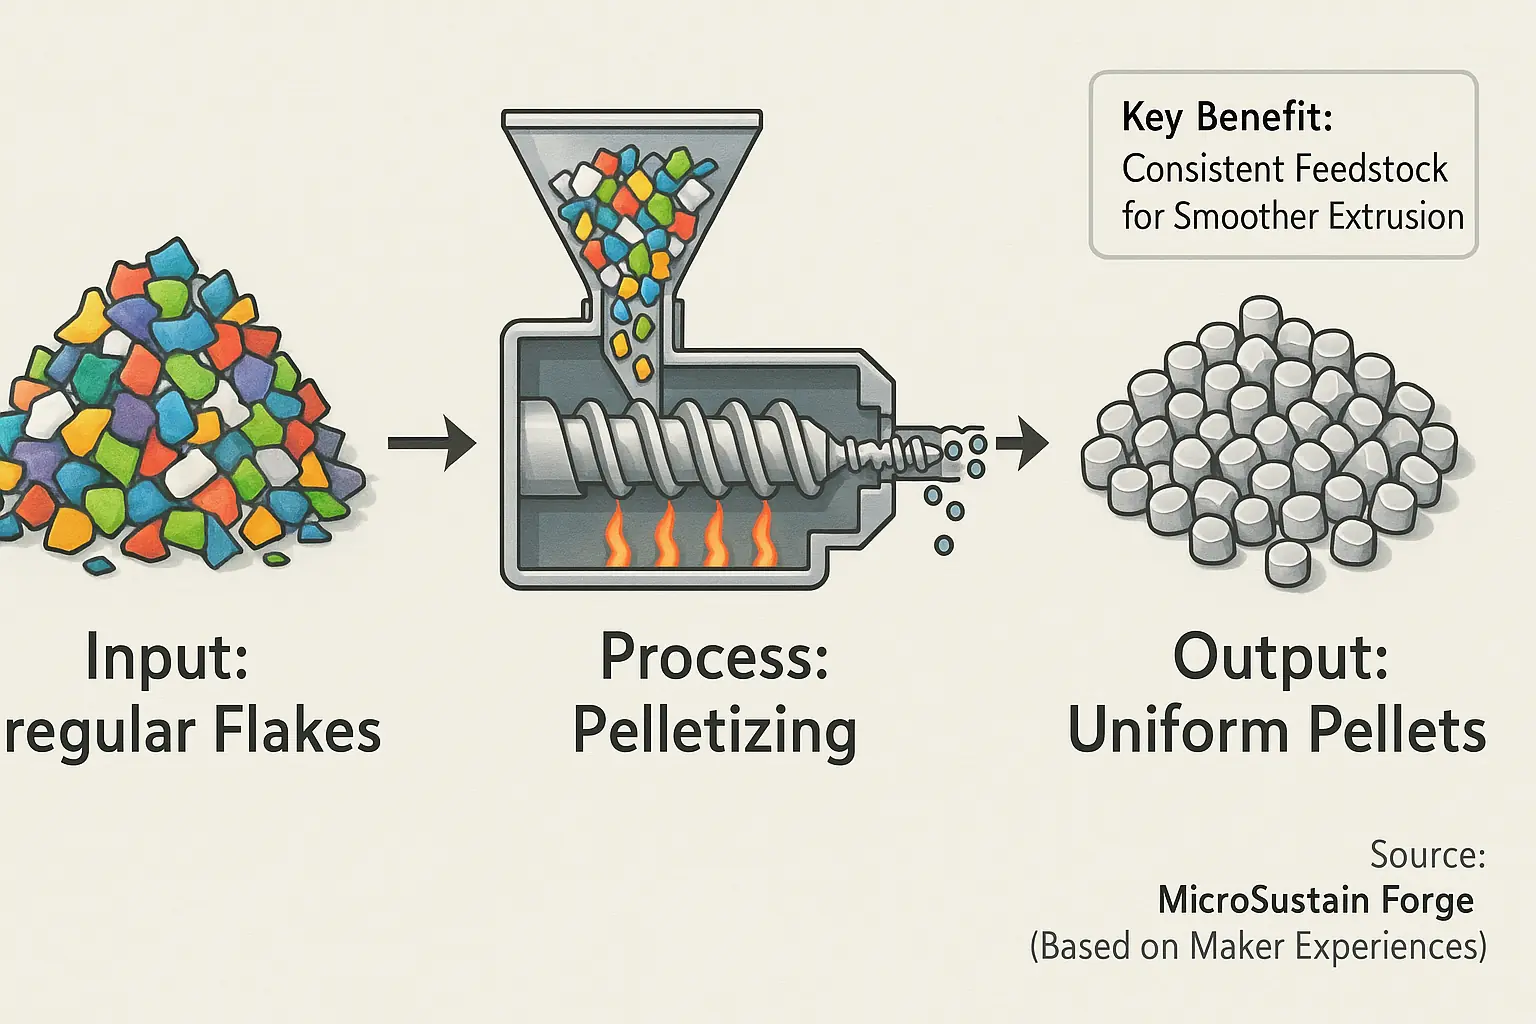
You've shredded your plastic. Those irregular flakes, however, often prove less than ideal for direct filament extruder use. Pelletizing offers a refinement. This process transforms varied shredded waste into small, consistently sized pellets. Such uniform feedstock significantly improves the subsequent filament extrusion process.
Makers who pelletize frequently report substantially better filament consistency. Pellets feed more smoothly. This smoother feeding action directly reduces extruder jams and unwanted diameter variations in filament. It is an additional step, true. Many in the community find the resulting print quality improvements fully justify the effort.
Community members have actively experimented with diverse DIY pelletizing methods. These approaches range from modified common grinders to custom-fabricated specialized dies. Achieving consistent pellet size and quality remains the principal challenge. Success often requires patience. A well-considered setup also proves crucial for reliable results.
Aiming for top-tier homemade filament quality? Pelletizing shredded plastic is a processing step genuinely worth your exploration. For many aspiring home filament producers, it represents a critical, often overlooked, link. This step elevates recycled material feedstock for superior extrusion outcomes.
Beyond the Bin: Creative Reuse Ideas for Empty Filament Spools
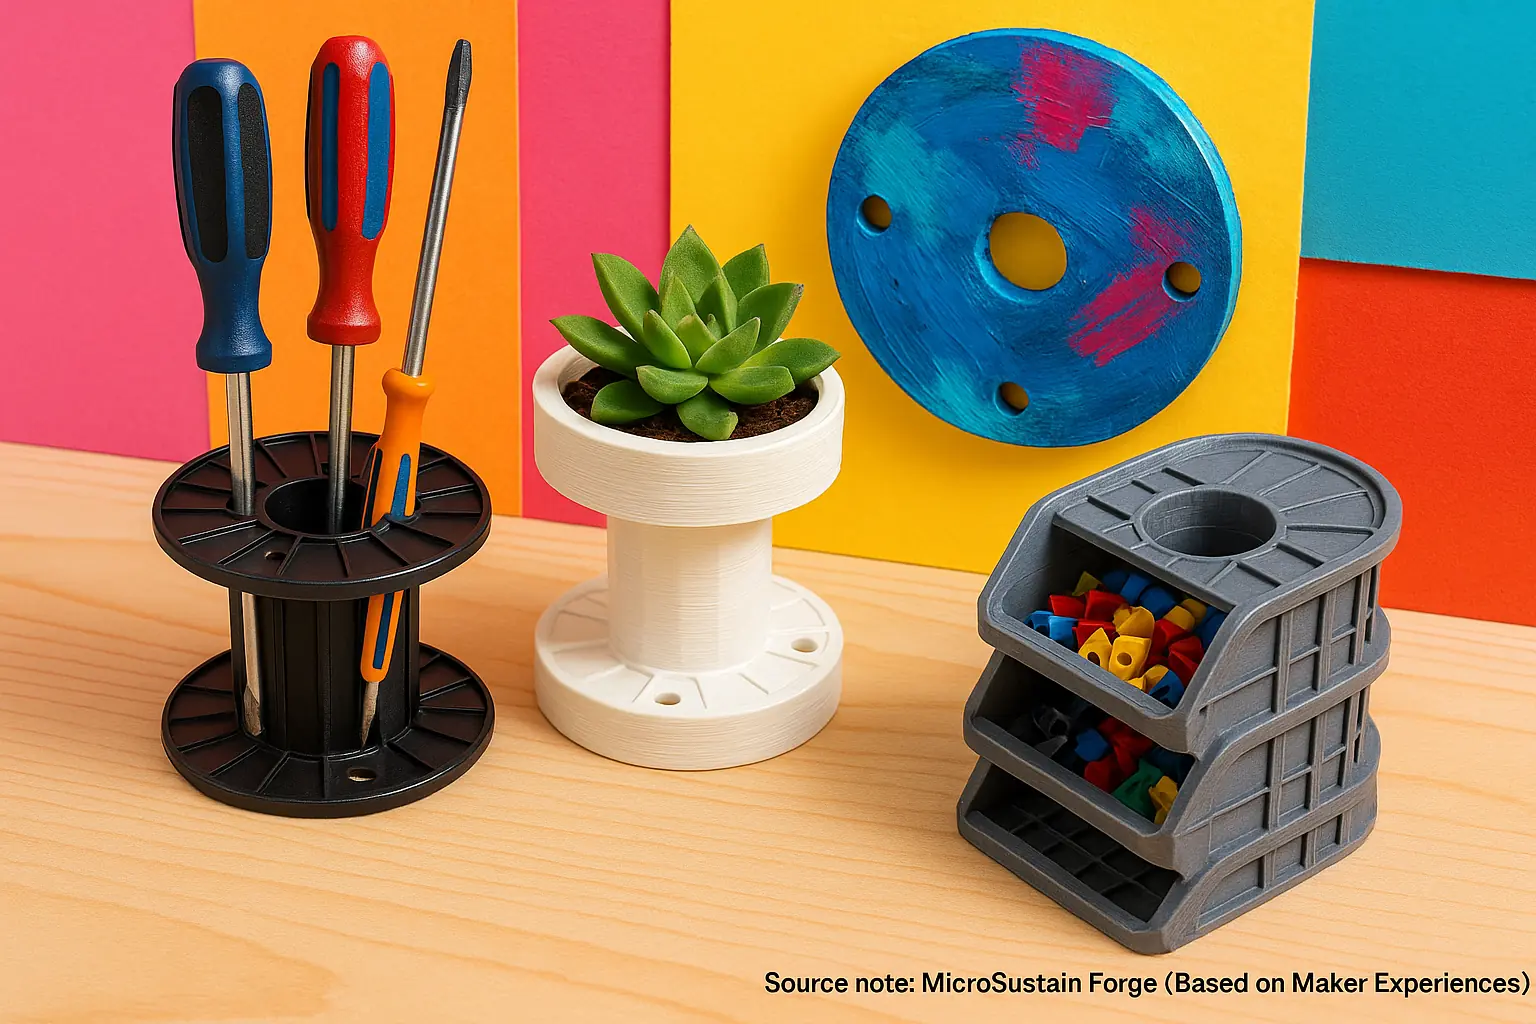
Every 3D printer owner knows the struggle. A growing pile of empty filament spools accumulates. These spools feel too good for simple disposal. What, then, can you do with them? The maker community presents brilliant answers for this frequent problem. Users reveal abundant creative reuse ideas online.
Makers transform spools into incredibly useful workshop organizers. They become custom holders for tools. Or wire spools. Small parts bins too. These repurposed spools are sturdy. They stack well. Their size usually perfectly fits common workshop items.
Spools also serve as fantastic canvases for maker creativity. This extends beyond pure function. Users turn them into personalized wall art. Some become decorative planters. Others integrate spools as components for larger artistic sculptures. The spool's circular shape presents abundant design possibilities.
Do not let those empty spools gather dust. They are a resource. Each empty spool is a free, versatile item. It awaits your next upcycling project. Upcycling spools provides a fun way to reduce plastic waste. You also add a special, personal touch to your creative space.
Forging a Sustainable Future: Your Next Steps in DIY Recycling
We explored DIY 3D print waste recycling realities. Shredders. Creative reuse. We detailed both. This journey demands patience. Real patience. It also requires a firm safety commitment. Learning from every melted plastic piece is absolutely essential for progress. This is the unvarnished truth.
Every step you take matters. Immensely. Meticulous sorting of plastics contributes. Building a simple shredder can be a big win. Finding new life for a single failed print reduces waste. These actions together forge a more sustainable maker future. The community constantly innovates. So can you. Progress beats perfection.
Ready to forge ahead? Dive deeper into specific recycling setups on our site. Or, explore how larger community initiatives are making a significant impact. Your journey towards a truly zero-waste workshop starts now. Take that first step.
Related Insight: Community 3D Print Waste Recycling: Successful Maker Group Initiatives & How to Start One (UGC Examples)
3D print waste definitely accumulates. Many makers grapple with this plastic challenge, searching for better solutions beyond the bin. The good news? Community-led recycling efforts are making a real difference, turning waste streams into valuable resources right in local areas.
Our extensive community data mining uncovers inspiring maker groups successfully tackling this. We are compiling these user experiences. Soon, we will detail these successful community 3D print waste recycling initiatives. You will learn how to start one yourself.
Related Insight: DIY Microfactory for Plastic Recycling: From Waste Collection to New Product (Integrated UGC Approach)
Ambitious makers push past simple recycling. They want more. Total material transformation becomes their focus.
Our synthesis of user experiences reveals this drive. Many are exploring DIY microfactory setups. These systems integrate every crucial step. From careful plastic waste collection to entirely new product creation. An advanced home recycling vision, made real by dedicated individuals.